Microsoft Outlook XP/en
Aus EUserv Wiki
Root (Diskussion | Beiträge) |
Root (Diskussion | Beiträge) |
||
| Zeile 1: | Zeile 1: | ||
{{Languages|Microsoft Outlook XP}} | {{Languages|Microsoft Outlook XP}} | ||
[[Kategorie:Email setup]] | [[Kategorie:Email setup]] | ||
| - | + | ''''' Microsoft Outlook XP ''''' | |
| - | = Microsoft Outlook XP = | + | __TOC__ |
| - | + | = Microsoft Outlook XP = | |
| - | + | ||
| - | + | ||
| - | + | ||
== Email account setup == | == Email account setup == | ||
| - | |||
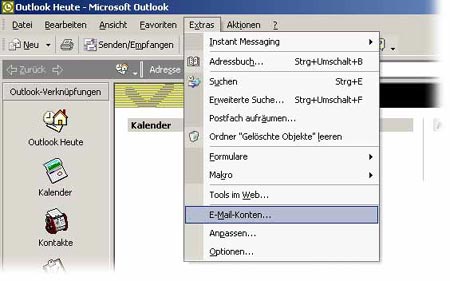
Open Outlook XP and select '''„Tools“''' -> '''„E-mail Accounts…“''' | Open Outlook XP and select '''„Tools“''' -> '''„E-mail Accounts…“''' | ||
| - | + | <center> | |
[[Datei:outlook-xp-1.jpg]] | [[Datei:outlook-xp-1.jpg]] | ||
| - | + | </center> | |
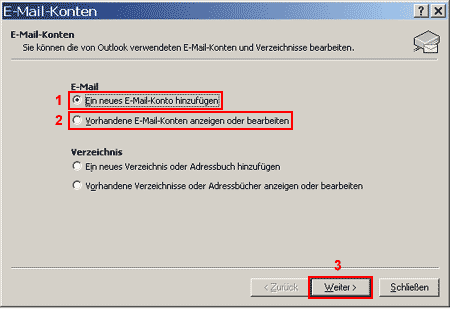
The window "E-mail Accounts" opens up. | The window "E-mail Accounts" opens up. | ||
Choose whether you want to "Add a new e-mail account"'''(1)''' or „View or change existing e-mail accounts"'''(2)'''. | Choose whether you want to "Add a new e-mail account"'''(1)''' or „View or change existing e-mail accounts"'''(2)'''. | ||
| - | + | <center> | |
[[Datei:outlook-xp-2.gif]] | [[Datei:outlook-xp-2.gif]] | ||
| - | + | </center> | |
Please click on the "Next“'''(3)''' button. | Please click on the "Next“'''(3)''' button. | ||
| - | + | <center> | |
[[Datei:outlook-xp-3.gif]] | [[Datei:outlook-xp-3.gif]] | ||
| - | + | </center> | |
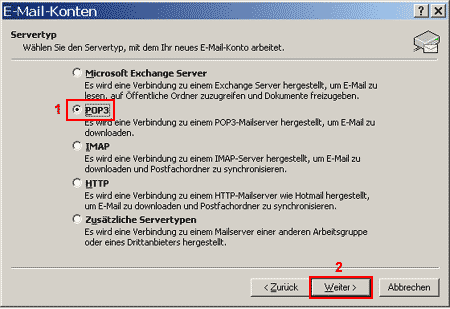
To retrieve your eMails from our servers you need a „POP3“'''(1)''' connection. | To retrieve your eMails from our servers you need a „POP3“'''(1)''' connection. | ||
Please click on the „Next“'''(2)''' button. | Please click on the „Next“'''(2)''' button. | ||
| - | + | <center> | |
[[Datei:outlook-xp-4.gif]] | [[Datei:outlook-xp-4.gif]] | ||
| - | + | </center> | |
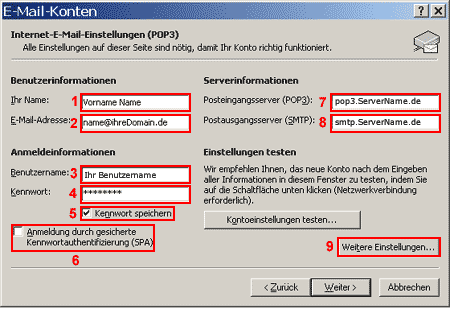
Enter your full name into the field „Your Name“'''(1)'''. | Enter your full name into the field „Your Name“'''(1)'''. | ||
Enter your eMail address into the field „E-mail Adress“'''(2)'''. | Enter your eMail address into the field „E-mail Adress“'''(2)'''. | ||
| Zeile 40: | Zeile 36: | ||
The window "Internet E-mail Settings" opens up. | The window "Internet E-mail Settings" opens up. | ||
| - | + | <center> | |
[[Datei:outlook-xp-5.gif]] | [[Datei:outlook-xp-5.gif]] | ||
| - | + | </center> | |
Under the "General"'''(1)''' tab enter a freely selectable name (e.g. your name) for your eMail account into the first field. | Under the "General"'''(1)''' tab enter a freely selectable name (e.g. your name) for your eMail account into the first field. | ||
Select the tab "Outgoing Server"'''(1)'''. | Select the tab "Outgoing Server"'''(1)'''. | ||
| - | + | <center> | |
[[Datei:outlook-xp-6.gif]] | [[Datei:outlook-xp-6.gif]] | ||
| - | + | </center> | |
The checkbox „My outgoing server (SMTP) requires authentication"'''(2)''' has to be checked. | The checkbox „My outgoing server (SMTP) requires authentication"'''(2)''' has to be checked. | ||
Select the radio button „Use same settings as my incoming mail server"'''(3)'''. | Select the radio button „Use same settings as my incoming mail server"'''(3)'''. | ||
| Zeile 55: | Zeile 51: | ||
Again the "E-mail Accounts" window opens up. | Again the "E-mail Accounts" window opens up. | ||
| - | + | <center> | |
[[Datei:outlook-xp-7.gif]] | [[Datei:outlook-xp-7.gif]] | ||
| - | + | </center> | |
Please click the button „Finish“'''(1)'''. | Please click the button „Finish“'''(1)'''. | ||
Your eMail account has been set up and is ready for receiving and sending eMails. | Your eMail account has been set up and is ready for receiving and sending eMails. | ||
Version vom 07:56, 14. Sep. 2012
| | Languages: |
Deutsch |
Microsoft Outlook XP
Inhaltsverzeichnis |
Microsoft Outlook XP
Email account setup
Open Outlook XP and select „Tools“ -> „E-mail Accounts…“
The window "E-mail Accounts" opens up. Choose whether you want to "Add a new e-mail account"(1) or „View or change existing e-mail accounts"(2).
Please click on the "Next“(3) button.
To retrieve your eMails from our servers you need a „POP3“(1) connection. Please click on the „Next“(2) button.
Enter your full name into the field „Your Name“(1). Enter your eMail address into the field „E-mail Adress“(2). Enter your username into the field „User Name“(3). Enter your password into the field „Password“(4) (case sensitive!). You should only check the box „Remember password“(5) if you are the only user of the PC The checkbox „Log on using...“(6) must not be checked. Enter "pop3.ServerName.de" into the field „Incoming mail server“(7). Enter "smtp.ServerName.de into the field "Outgoing mail server“(8). Please click on the „More Settings“(9) button.
The window "Internet E-mail Settings" opens up.
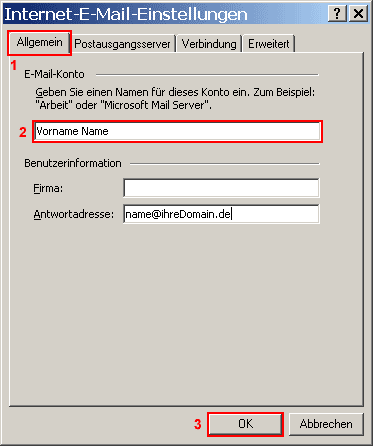
Under the "General"(1) tab enter a freely selectable name (e.g. your name) for your eMail account into the first field.
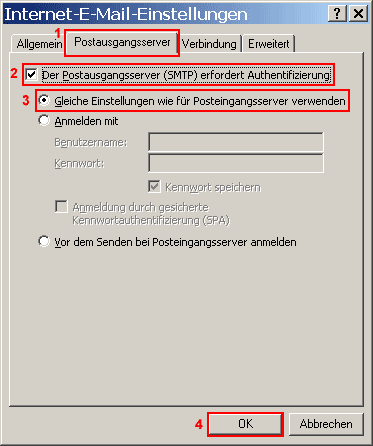
Select the tab "Outgoing Server"(1).
The checkbox „My outgoing server (SMTP) requires authentication"(2) has to be checked. Select the radio button „Use same settings as my incoming mail server"(3). Please confirm by clicking the „OK“(4) button.
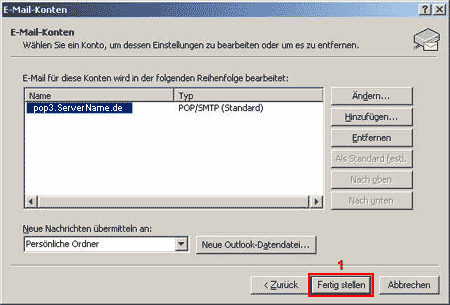
Again the "E-mail Accounts" window opens up.
Please click the button „Finish“(1).
Your eMail account has been set up and is ready for receiving and sending eMails.

