Kundencenter Server IP Adressen/en
Aus EUserv Wiki
Sufr1 (Diskussion | Beiträge) |
Sufr1 (Diskussion | Beiträge) |
||
| Zeile 8: | Zeile 8: | ||
</div> | </div> | ||
== General== | == General== | ||
| - | |||
| - | You also need special parameters that you can find in the customer | + | For any dedicated server EUserv customer center offers the opportunity to configure your comprehensively. You also need special parameters that you can also find in the customer center. The option "IPv6 addresses" enables you to set, view and configure IPv6-addresses, Reverse-DNS and IPv6-nets to run your server. |
| - | + | Please note: The available number of IPv6-addresses varies according to the particular booked plan. | |
| - | == | + | <br> |
| - | + | == Creating and managing IPv6-addresses == | |
| - | + | <br> | |
| - | + | === Creating Server Main-IPv6-address === | |
| - | Choose | + | <br> |
| + | The Server Main-IPv6 is the IP-address which is initially assigned to your server. | ||
| + | You can assign the Server Main-IPv6-address for your server via customer center. | ||
| + | <br> | ||
| + | Please proceed as follows: | ||
| + | <br> | ||
| + | <br> | ||
| + | * Choose your Server-contract which you like to assign a Main-IPv6-address | ||
<br> | <br> | ||
<br> | <br> | ||
<center> | <center> | ||
| - | [[Datei: | + | [[Datei:1_EN_kc_vertrag_waehlen.png]] |
</center> | </center> | ||
<br> | <br> | ||
<br> | <br> | ||
| - | Once you have selected your contract, click on " | + | * Once you have selected your contract, click on "IPv6-Adresses" in the corresponding register |
<br> | <br> | ||
<br> | <br> | ||
<center> | <center> | ||
| - | [[Datei: | + | [[Datei:2_EN_kc_vertrag_detailauswahl.png]] |
</center> | </center> | ||
| + | <br> | ||
| + | <br> | ||
| + | * Please click the button "Anlegen" in section "Server Main-IPv6 to assign the Main-IPv6-address to your server | ||
| + | <br> | ||
| + | <br> | ||
| + | <center> | ||
| + | [[Datei:3_EN_kc_vertrag_ipv6anlegen.png]] | ||
| + | </center> | ||
| + | <br> | ||
<br> | <br> | ||
<br> | <br> | ||
| - | == | + | === Displaying the Server Main-IPv6-address === |
| - | + | <br> | |
| - | + | EUserv customer center offers the possibility to display the Server Main-IPv6-address for your server. | |
| - | + | <br> | |
| - | + | Therefor please proceed as follows: | |
| - | + | <br> | |
| - | + | <br> | |
| - | + | * Choose your server contract wherefore you like to display the Main-IPv6-address | |
| - | + | ||
<br> | <br> | ||
<br> | <br> | ||
<center> | <center> | ||
| - | [[Datei: | + | [[Datei:1_EN_kc_vertrag_waehlen.png]] |
</center> | </center> | ||
| + | <br> | ||
| + | <br> | ||
| + | * Once you have selected your contract, click on "IPv6-Adresses" in the corresponding register | ||
| + | <br> | ||
| + | <br> | ||
| + | <center> | ||
| + | [[Datei:2_EN_kc_vertrag_detailauswahl.png]] | ||
| + | </center> | ||
| + | <br> | ||
| + | <br> | ||
| + | * In section "Server Main-IPv6" you now can see the assigned Main-IPv6-address as well as the according gateway and the corresponding MAC-address. | ||
| + | <br> | ||
| + | <br> | ||
| + | <center> | ||
| + | [[Datei:4_EN_kc_vertrag_ipv6verwalten.png]] | ||
| + | </center> | ||
| + | <br> | ||
<br> | <br> | ||
<br> | <br> | ||
| - | == | + | === Generating further IPv6-addresses === |
| - | + | <br> | |
| - | + | Depending on the booked plan further free IPv6-addresses may be included. To generate further IPv6-addresses for your server, please proceed as follows: | |
| - | + | ||
| - | + | ||
| - | + | ||
| - | + | ||
| - | + | ||
| - | + | ||
| - | + | ||
| - | + | ||
| - | + | ||
| - | + | ||
| - | + | ||
| + | <br> | ||
| + | * Choose your server contract wherefore you like to generate further IPv6-addresses | ||
<br> | <br> | ||
<br> | <br> | ||
<center> | <center> | ||
| - | [[Datei: | + | [[Datei:1_EN_kc_vertrag_waehlen.png]] |
</center> | </center> | ||
| + | <br> | ||
| + | * Once you have selected your contract, click on "IPv6-Adresses" in the corresponding register | ||
| + | <br> | ||
| + | <br> | ||
| + | <center> | ||
| + | [[Datei:2_EN_kc_vertrag_detailauswahl.png]] | ||
| + | </center> | ||
| + | <br> | ||
| + | * In section "New IPv6-Address" you can now generate further IPv6-addresses depending on your plan | ||
| + | <br> | ||
| + | <br> | ||
| + | <center> | ||
| + | [[Datei:5_EN_kc_vertrag_neueipv6.png]] | ||
| + | </center> | ||
| + | <br> | ||
| + | <br> | ||
| + | Here you'll find a detailed guide for configuration of further IP-addresses depending on the corresponding operating system: | ||
| + | https://www.euserv.com/wiki/index.php/Manual_Konfiguration_IP-Adressen/en | ||
| + | <br> | ||
<br> | <br> | ||
<br> | <br> | ||
| - | + | === Creating the reverse DNS entry === | |
| + | <br> | ||
| + | Via EUserv customer center you may also create the Reverse-DNS entry for your server | ||
| + | <br> | ||
| + | Therefor please proceed as follows: | ||
| + | <br> | ||
| + | * Choose your server contract wherefore you like to create the Reverse-DNS entry | ||
<br> | <br> | ||
<br> | <br> | ||
<center> | <center> | ||
| - | [[Datei: | + | [[Datei:1_EN_kc_vertrag_waehlen.png]] |
</center> | </center> | ||
| + | <br> | ||
| + | * Once you have selected your contract, click on "IPv6-Adresses" in the corresponding register | ||
| + | <br> | ||
| + | <br> | ||
| + | <center> | ||
| + | [[Datei:2_EN_kc_vertrag_detailauswahl.png]] | ||
| + | </center> | ||
| + | <br> | ||
| + | * In the section "Server Main-IPv6" you may generate the Reverse-DNS entry and activate with a click on the button "Create" | ||
| + | <br> | ||
| + | <br> | ||
| + | <center> | ||
| + | [[Datei:4_EN_kc_vertrag_ipv6verwalten.png]] | ||
| + | </center> | ||
| + | <br> | ||
| + | <br> | ||
| + | * At last you get the notification about the successful change of your Reverse-DNS entry. | ||
| + | <br> | ||
<br> | <br> | ||
<br> | <br> | ||
| - | == | + | === Creating additional Co-IPv6-adresses === |
| - | + | <br> | |
| - | If | + | If the maximum number of IPv6-Addresses without costs is reached, depending on your plan you may have the opportunity to create additional new IP addresses from net with costs. The number of possible additional Co-IPv6-addresses is identical to the number of possible additional Co-IPv4-addresses offered in your plan. |
| - | + | <br> | |
| - | + | <br> | |
| - | + | ''[[For example:]] | |
| + | If your plan supports 10 IPv4-addresses without costs und 30 additional Co-IPv4-addresses with costs, it also supports 10 IPv6-addresses without costs und 30 additional Co-IPv6-addresses with costs .'' | ||
| + | <br> | ||
| + | Please check the supported number of Ip-addresses in the contract details of your server plan. | ||
| + | <br> | ||
| + | If you like to create additional CoIPv6-addresses, please proceed as follows: | ||
| + | <br> | ||
| + | <br> | ||
| + | * Choose your server contract wherefore you like to create additional Co-IPv6-addresses | ||
<br> | <br> | ||
<br> | <br> | ||
<center> | <center> | ||
| - | [[Datei: | + | [[Datei:1_EN_kc_vertrag_waehlen.png]] |
</center> | </center> | ||
| + | <br> | ||
| + | * Once you have selected your contract, click on "IPv6-Adresses" in the corresponding register | ||
| + | <br> | ||
| + | <br> | ||
| + | <center> | ||
| + | [[Datei:2_EN_kc_vertrag_detailauswahl.png]] | ||
| + | </center> | ||
| + | <br> | ||
| + | <br> | ||
| + | * In the section "New IPv6-Address" you may generate the additional IPs and activate with a click on the button "Create" | ||
| + | <br> | ||
| + | <br> | ||
| + | <center> | ||
| + | [[Datei:7_EN_kc_vertrag_coIPv6.png]] | ||
| + | </center> | ||
| + | <br> | ||
| + | <br> | ||
| + | Please note that these additional new IP-addresses are with costs! | ||
| + | <br> | ||
<br> | <br> | ||
<br> | <br> | ||
| - | + | === Configuring additional Co-IPv6-addresses === | |
| + | <br> | ||
| + | Additional Co-IPv6-addresses have to be configured to provide availability of your server via these addresses. | ||
| + | <br> | ||
| + | <br> | ||
| + | Here you'll find a detailed guide for configuration of further IP-addresses depending on the corresponding operating system: | ||
| + | https://www.euserv.com/wiki/index.php/Manual_Konfiguration_IP-Adressen/en | ||
| + | <br> | ||
| + | <br> | ||
| + | == Creating and managing of IPv6-Nets == | ||
| + | <br> | ||
| + | === Creating IPv6-Nets === | ||
| + | <br> | ||
| + | According to your plan EUserv customer center also offers the possibility to assign an IPv6-net to your server. | ||
| + | <br> | ||
| + | Therefor please proceed as follows: | ||
| + | <br> | ||
| + | * Choose your server contract wherefore you like to create an IPv6-net | ||
<br> | <br> | ||
<br> | <br> | ||
<center> | <center> | ||
| - | [[Datei: | + | [[Datei:1_EN_kc_vertrag_waehlen.png]] |
</center> | </center> | ||
<br> | <br> | ||
| + | <br> | ||
| + | * Once you have selected your contract, click on "IPv6-Adresses" in the corresponding register | ||
| + | <br> | ||
| + | <br> | ||
| + | <center> | ||
| + | [[Datei:2_EN_kc_vertrag_detailauswahl.png]] | ||
| + | </center> | ||
| + | <br> | ||
| + | <br> | ||
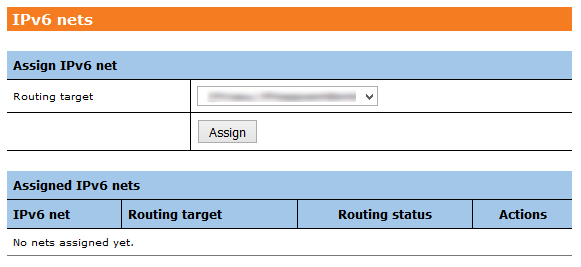
| + | * Choose section "IPv6 nets" and assign the corresponding IPv6-address to your Routing Target. Confirm your selection with click on button "Assign" | ||
| + | <br> | ||
| + | <br> | ||
| + | <center> | ||
| + | [[Datei:10_EN_kc_vertrag_ipv6netze.png]] | ||
| + | </center> | ||
| + | <br> | ||
| + | <br> | ||
| + | * Subsequently you can see and manage the assigned IPv6-net in the section "Assigned IPv6 nets" below. | ||
<br> | <br> | ||
Version vom 09:49, 28. Nov. 2016
Manage the server IPv6 addresses
Inhaltsverzeichnis |
Manage the server IPv6 addresses
General
For any dedicated server EUserv customer center offers the opportunity to configure your comprehensively. You also need special parameters that you can also find in the customer center. The option "IPv6 addresses" enables you to set, view and configure IPv6-addresses, Reverse-DNS and IPv6-nets to run your server.
Please note: The available number of IPv6-addresses varies according to the particular booked plan.
Creating and managing IPv6-addresses
Creating Server Main-IPv6-address
The Server Main-IPv6 is the IP-address which is initially assigned to your server.
You can assign the Server Main-IPv6-address for your server via customer center.
Please proceed as follows:
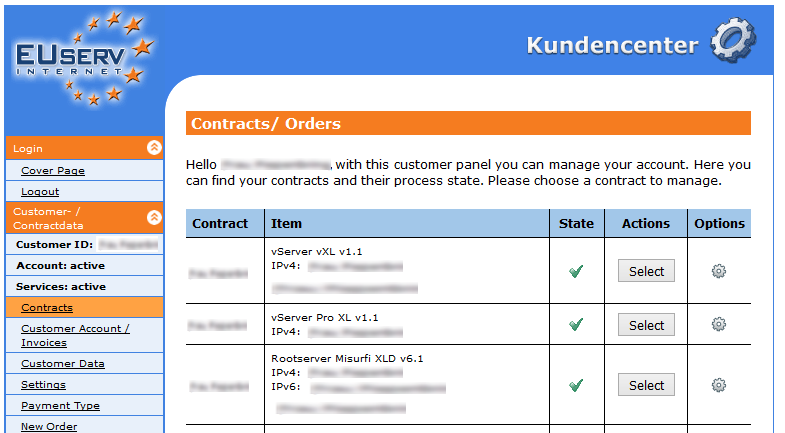
- Choose your Server-contract which you like to assign a Main-IPv6-address
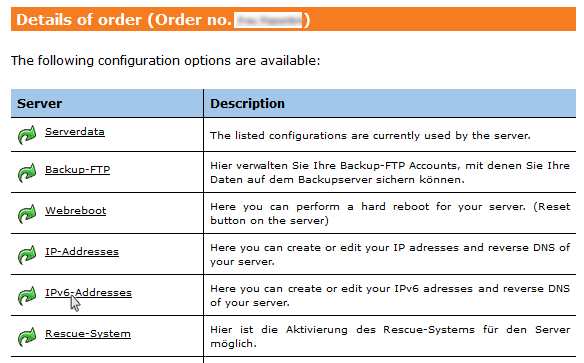
- Once you have selected your contract, click on "IPv6-Adresses" in the corresponding register
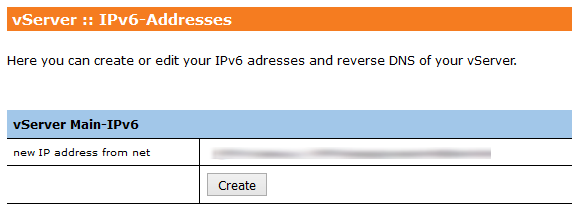
- Please click the button "Anlegen" in section "Server Main-IPv6 to assign the Main-IPv6-address to your server
Displaying the Server Main-IPv6-address
EUserv customer center offers the possibility to display the Server Main-IPv6-address for your server.
Therefor please proceed as follows:
- Choose your server contract wherefore you like to display the Main-IPv6-address
- Once you have selected your contract, click on "IPv6-Adresses" in the corresponding register
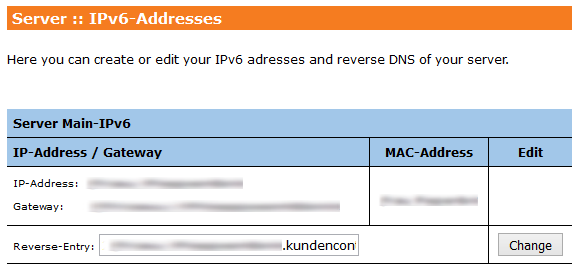
- In section "Server Main-IPv6" you now can see the assigned Main-IPv6-address as well as the according gateway and the corresponding MAC-address.
Generating further IPv6-addresses
Depending on the booked plan further free IPv6-addresses may be included. To generate further IPv6-addresses for your server, please proceed as follows:
- Choose your server contract wherefore you like to generate further IPv6-addresses
- Once you have selected your contract, click on "IPv6-Adresses" in the corresponding register
- In section "New IPv6-Address" you can now generate further IPv6-addresses depending on your plan
Here you'll find a detailed guide for configuration of further IP-addresses depending on the corresponding operating system:
https://www.euserv.com/wiki/index.php/Manual_Konfiguration_IP-Adressen/en
Creating the reverse DNS entry
Via EUserv customer center you may also create the Reverse-DNS entry for your server
Therefor please proceed as follows:
- Choose your server contract wherefore you like to create the Reverse-DNS entry
- Once you have selected your contract, click on "IPv6-Adresses" in the corresponding register
- In the section "Server Main-IPv6" you may generate the Reverse-DNS entry and activate with a click on the button "Create"
- At last you get the notification about the successful change of your Reverse-DNS entry.
Creating additional Co-IPv6-adresses
If the maximum number of IPv6-Addresses without costs is reached, depending on your plan you may have the opportunity to create additional new IP addresses from net with costs. The number of possible additional Co-IPv6-addresses is identical to the number of possible additional Co-IPv4-addresses offered in your plan.
For example:
If your plan supports 10 IPv4-addresses without costs und 30 additional Co-IPv4-addresses with costs, it also supports 10 IPv6-addresses without costs und 30 additional Co-IPv6-addresses with costs .
Please check the supported number of Ip-addresses in the contract details of your server plan.
If you like to create additional CoIPv6-addresses, please proceed as follows:
- Choose your server contract wherefore you like to create additional Co-IPv6-addresses
- Once you have selected your contract, click on "IPv6-Adresses" in the corresponding register
- In the section "New IPv6-Address" you may generate the additional IPs and activate with a click on the button "Create"
Please note that these additional new IP-addresses are with costs!
Configuring additional Co-IPv6-addresses
Additional Co-IPv6-addresses have to be configured to provide availability of your server via these addresses.
Here you'll find a detailed guide for configuration of further IP-addresses depending on the corresponding operating system:
https://www.euserv.com/wiki/index.php/Manual_Konfiguration_IP-Adressen/en
Creating and managing of IPv6-Nets
Creating IPv6-Nets
According to your plan EUserv customer center also offers the possibility to assign an IPv6-net to your server.
Therefor please proceed as follows:
- Choose your server contract wherefore you like to create an IPv6-net
- Once you have selected your contract, click on "IPv6-Adresses" in the corresponding register
- Choose section "IPv6 nets" and assign the corresponding IPv6-address to your Routing Target. Confirm your selection with click on button "Assign"
- Subsequently you can see and manage the assigned IPv6-net in the section "Assigned IPv6 nets" below.

