Kundencenter Email-Accounts/en
Aus EUserv Wiki
Seki1 (Diskussion | Beiträge) |
|||
| Zeile 8: | Zeile 8: | ||
</div> | </div> | ||
== General== | == General== | ||
| - | If you have an EUserv mail or webspace plan | + | If you have an EUserv mail or webspace plan you can use it to send, receive and manage emails. |
| - | To receive and send | + | To receive and send emails you need to create an email account within your contract. |
| - | These email accounts are the basis for sending and receiving. | + | These email accounts are the basis for sending and receiving. You can point your individual email aliases to these email accounts. |
| - | == Creating accounts == | + | == Creating email accounts == |
| - | In the EUserv customer | + | In the EUserv customer panel you have the possibility to create different email accounts (mailboxes). |
| - | Please note that you must create | + | Please note that you must create an email forward (alias) for each email account to use the email account. Here you can read how to setup email forwarding (alias): [[Kundencenter_Email_Weiterleitung_Alias/en]]. |
| - | + | Proceed as follows: <br><br> | |
| + | |||
| + | 1. Log in to customer panel. | ||
| + | <br><br> | ||
| + | 2. Click in the left menu in the section <b>Customer- / Contractdata</b> the menue item <b>Contracts</b>. | ||
| + | <br><br> | ||
| + | 3. Then click on the tab for the desired product group (for example, <b>Domain</b> or <b>Webspace</b>). Now select your contract by clicking on <b>Select</b>.<br><br> | ||
| + | |||
| + | <center> | ||
| + | [[Datei:Kc2_select_contract_webspace_en.png|800px]] | ||
| + | </center> | ||
| + | <br> | ||
| + | 4. Once you have selected your contract, now click on <b>Email-Accounts</b>. | ||
<br> | <br> | ||
<br> | <br> | ||
<center> | <center> | ||
| - | [[Datei: | + | [[Datei:Kc2_webspace_config_en.png|800px]] |
</center> | </center> | ||
<br> | <br> | ||
| + | 5. Here you can create your mailboxes (email accounts. Click on <b>Create</b> to proceed. | ||
<br> | <br> | ||
| - | + | <br> | |
| + | <center> | ||
| + | [[Datei:Kc2_email_accounts_overview_fresh_en.png|800px]] | ||
| + | </center> | ||
| + | <br> | ||
| + | <br> | ||
| + | |||
| + | === Creating email accounts (mailboxes) === | ||
| + | |||
| + | In this part of the customer panel you can create the desired email accounts. Each email account consists of a fixed part (e.g., pop111111) and a variable part. The variable portion can be freely chosen by you and must contain letters and/or numbers. Note that the variable part cannot be changed later! | ||
| + | |||
| + | The variable part can be defined in <b>Inbox/Username</b> with the maximum of 16 characters. | ||
| + | In the two input fields below (<b>Set Password</b> and <b>Set Password again</b>) you enter your password. The password must be at least 8 to 16 characters long and must contain at least 2 digits, 2 lowercase letters and 2 uppercase letters. | ||
| + | |||
| + | Finally, you should decide how much space you want to assign to the email account (<b>Inbox Size / Mailquota in MB</b>). Please make sure that you assign enough mailspace to your email account in order to prevent fast overflow. | ||
| + | |||
| + | However, you cannot exceed the maximum mailquota. You can see the maximum mailquota in the input line. In our example: <b>max. Quota of 8000MB cannot be exceeded</b>. | ||
| + | Also choose your quota size depending on how many mailboxes you want to add in the future. | ||
<br> | <br> | ||
<br> | <br> | ||
<center> | <center> | ||
| - | [[Datei: | + | [[Datei:Kc2_email_accounts_create_en.png|800px]] |
</center> | </center> | ||
<br> | <br> | ||
<br> | <br> | ||
| - | + | ||
| + | === Editing/deleting email accounts (mailboxes) === | ||
| + | |||
| + | To change an email account (mailbox) click on the overview page <b>Email-Accounts</b> right next to the email account on <b>Edit</b>. If you want to delete an email account click on <b>Delete</b>. | ||
| + | <br> | ||
<br> | <br> | ||
<br> | <br> | ||
<center> | <center> | ||
| - | [[Datei: | + | [[Datei:Kc2_email_accounts_overview_with_account_en.png|800px]] |
</center> | </center> | ||
<br> | <br> | ||
<br> | <br> | ||
| - | === | + | === Increase Mailspace (Mailquota) === |
| - | + | Depending on your plan you have the possibility to increase your mailquota by ordering additional mailspace. | |
| - | + | Proceed as follows: <br><br> | |
| - | + | ||
| - | + | ||
| - | + | 1. On the overview page <b>Email-Accounts</b> click on <b>Increase Mailquota</b>. | |
| - | + | <br><br> | |
| + | |||
| + | <center> | ||
| + | [[Datei:Kc2_email_accounts_overview_with_account_en.png|800px]] | ||
| + | </center> | ||
| + | <br> | ||
| + | 2. Choose the desired mailquota (Mailspace in MB). | ||
<br> | <br> | ||
<br> | <br> | ||
<center> | <center> | ||
| - | [[Datei: | + | [[Datei:Kc2_email_accounts_mailspace_select_quota_en.png|800px]] |
| + | </center> | ||
| + | <br> | ||
| + | 3. On the next window check and configure the desired contract settings on click on <b>Confirm</b>. Done - Your mailquota will be increased immediately and you can assign the mailspace to your mailboxes. | ||
| + | <br> | ||
| + | <br> | ||
| + | <center> | ||
| + | [[Datei:Kc2_email_accounts_mailspace_select_term_en.png|800px]] | ||
</center> | </center> | ||
<br> | <br> | ||
<br> | <br> | ||
| - | === | + | === Terminate Mailspace (Mailquota) === |
| - | + | You can terminate additional mailspace on the overview page <b>Email-Accounts</b>. Click on <b>Terminate</b> in the corresponding line <b>Additional Quota</b>. A security check appears that you must confirm with your account password. After that a confirmation window is shown with the earliest possible termination date. Click on <b>Confirm</b> to terminate the contract at the earliest possible date. You will receive a termiantion confirmation via email. | |
| - | + | ||
| - | + | ||
| - | < | + | |
<br> | <br> | ||
<br> | <br> | ||
<center> | <center> | ||
| - | [[Datei: | + | [[Datei:Kc2_email_accounts_overview_with_account_and_mailspace_en.png|800px]] |
</center> | </center> | ||
<br> | <br> | ||
<br> | <br> | ||
Aktuelle Version vom 14:48, 29. Okt. 2019
| | Languages: |
Deutsch |
Creating email accounts (mailboxes)
Inhaltsverzeichnis |
Creating email accounts (mailboxes)
General
If you have an EUserv mail or webspace plan you can use it to send, receive and manage emails.
To receive and send emails you need to create an email account within your contract.
These email accounts are the basis for sending and receiving. You can point your individual email aliases to these email accounts.
Creating email accounts
In the EUserv customer panel you have the possibility to create different email accounts (mailboxes).
Please note that you must create an email forward (alias) for each email account to use the email account. Here you can read how to setup email forwarding (alias): Kundencenter_Email_Weiterleitung_Alias/en.
Proceed as follows:
1. Log in to customer panel.
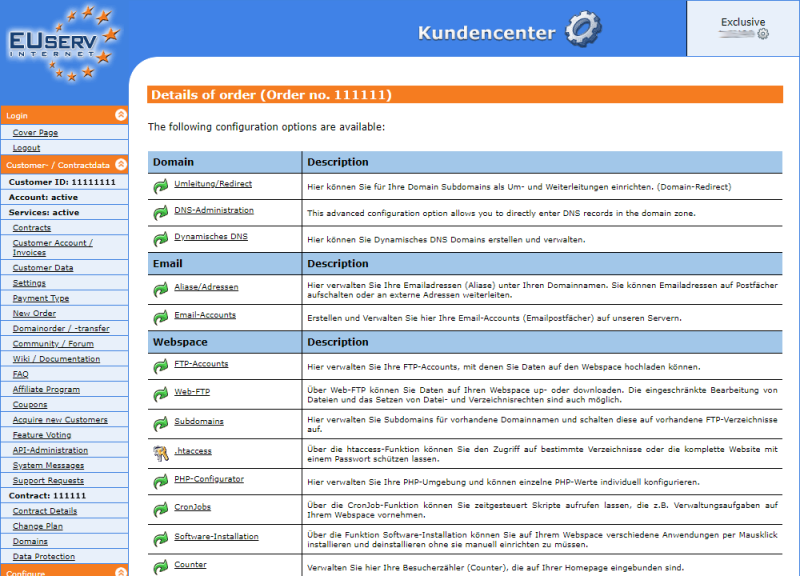
2. Click in the left menu in the section Customer- / Contractdata the menue item Contracts.
3. Then click on the tab for the desired product group (for example, Domain or Webspace). Now select your contract by clicking on Select.
4. Once you have selected your contract, now click on Email-Accounts.
5. Here you can create your mailboxes (email accounts. Click on Create to proceed.
Creating email accounts (mailboxes)
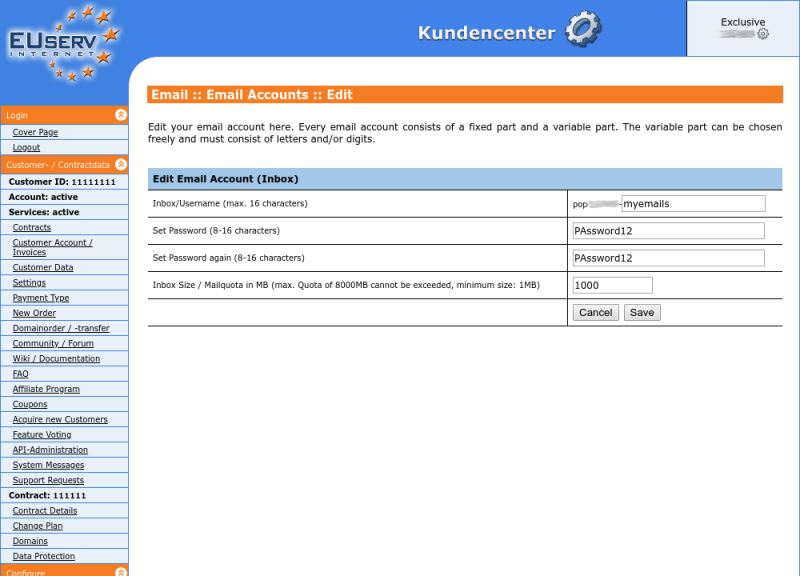
In this part of the customer panel you can create the desired email accounts. Each email account consists of a fixed part (e.g., pop111111) and a variable part. The variable portion can be freely chosen by you and must contain letters and/or numbers. Note that the variable part cannot be changed later!
The variable part can be defined in Inbox/Username with the maximum of 16 characters. In the two input fields below (Set Password and Set Password again) you enter your password. The password must be at least 8 to 16 characters long and must contain at least 2 digits, 2 lowercase letters and 2 uppercase letters.
Finally, you should decide how much space you want to assign to the email account (Inbox Size / Mailquota in MB). Please make sure that you assign enough mailspace to your email account in order to prevent fast overflow.
However, you cannot exceed the maximum mailquota. You can see the maximum mailquota in the input line. In our example: max. Quota of 8000MB cannot be exceeded.
Also choose your quota size depending on how many mailboxes you want to add in the future.
Editing/deleting email accounts (mailboxes)
To change an email account (mailbox) click on the overview page Email-Accounts right next to the email account on Edit. If you want to delete an email account click on Delete.
Increase Mailspace (Mailquota)
Depending on your plan you have the possibility to increase your mailquota by ordering additional mailspace.
Proceed as follows:
1. On the overview page Email-Accounts click on Increase Mailquota.
2. Choose the desired mailquota (Mailspace in MB).
3. On the next window check and configure the desired contract settings on click on Confirm. Done - Your mailquota will be increased immediately and you can assign the mailspace to your mailboxes.
Terminate Mailspace (Mailquota)
You can terminate additional mailspace on the overview page Email-Accounts. Click on Terminate in the corresponding line Additional Quota. A security check appears that you must confirm with your account password. After that a confirmation window is shown with the earliest possible termination date. Click on Confirm to terminate the contract at the earliest possible date. You will receive a termiantion confirmation via email.


