VKVM/en
Aus EUserv Wiki
Almi1 (Diskussion | Beiträge) K (Die Seite wurde geleert.) |
Almi1 (Diskussion | Beiträge) |
||
| Zeile 1: | Zeile 1: | ||
| + | == Establishing a VNC connection with vKVM == | ||
| + | To establish a secured VNC connection with the vKVM the program SSVNC [http://www.karlrunge.com/x11vnc/ssvnc.html#download] is recommended. | ||
| + | When you have started the program you should see the following window: | ||
| + | <center> | ||
| + | [[Datei:screen1.png|framed]] | ||
| + | </center> | ||
| + | Under '''VNC Host:Display''' enter the IP address of your server, followed by ''':5959''' ein. Under '''VNC Password''' enter the password which you can find in the customer center unter "server data". Make sure the tick under '''Use SSL''' is set. | ||
| + | |||
| + | Now go to '''Options --> Advanced''': | ||
| + | <center> | ||
| + | [[Datei:screen2.png|framed]] | ||
| + | </center> | ||
| + | Make sure the tick under '''Server uses VeNCrypt SSL encryption''' is not set: | ||
| + | <center> | ||
| + | [[Datei:screen3.png|framed]] | ||
| + | </center> | ||
| + | Still in the same window click '''Done''' in the lower right corner. Now you are back in the main window. Finally make sure the tick under '''Verify All Certs''' is not set and click the '''Connect''' button: | ||
| + | <center> | ||
| + | [[Datei:screen4.png|framed]] | ||
| + | </center> | ||
| + | By now you should be connected with the vKVM and see a BIOS screen, prompting you to select a hard drive from which you want to boot: | ||
| + | <center> | ||
| + | [[Datei:Screen5.png|framed]] | ||
| + | </center> | ||
| + | By entering the respective number the vKVM will boot the selected hard drive. If you want to quit your current session make sure you have saved all your data and shut down the system properly. This turns off the vKVM and ends your session. In order to boot your server as usual trigger a webreset in the customer center. | ||
Version vom 15:28, 19. Sep. 2012
Establishing a VNC connection with vKVM
To establish a secured VNC connection with the vKVM the program SSVNC [1] is recommended.
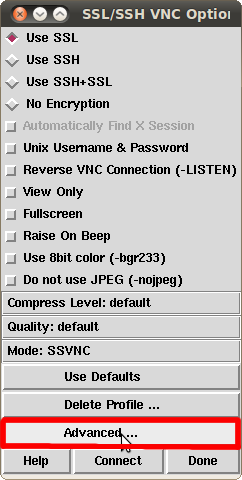
When you have started the program you should see the following window:
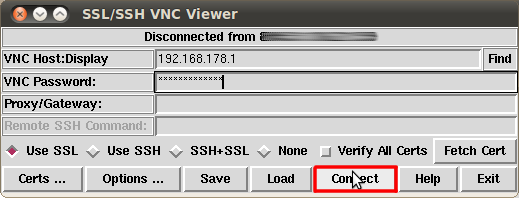
Under VNC Host:Display enter the IP address of your server, followed by :5959 ein. Under VNC Password enter the password which you can find in the customer center unter "server data". Make sure the tick under Use SSL is set.
Now go to Options --> Advanced:
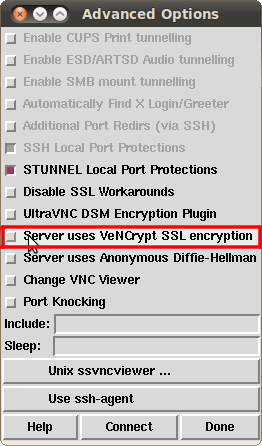
Make sure the tick under Server uses VeNCrypt SSL encryption is not set:
Still in the same window click Done in the lower right corner. Now you are back in the main window. Finally make sure the tick under Verify All Certs is not set and click the Connect button:
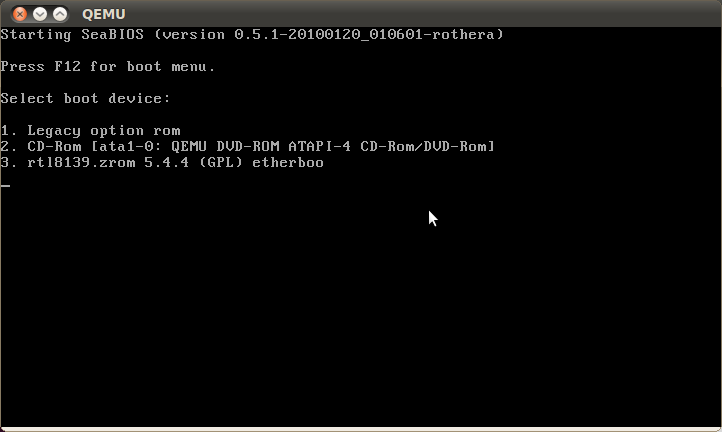
By now you should be connected with the vKVM and see a BIOS screen, prompting you to select a hard drive from which you want to boot:
By entering the respective number the vKVM will boot the selected hard drive. If you want to quit your current session make sure you have saved all your data and shut down the system properly. This turns off the vKVM and ends your session. In order to boot your server as usual trigger a webreset in the customer center.


